Working with Flux Job Hierarchies
A key feature of Flux is the ability to run an instance to manage a workload
in almost any environment. From a session started on a laptop with flux
start --test-size=1, to a batch job running across thousands of nodes
on a cluster, Flux provides a consistent interface to resources.
These resources and the work assigned to them may then be further
divided by running new instances of Flux as jobs via flux batch,
flux alloc, or flux submit ... flux start, each of which
can further divide resources through more instances, and so on. Since an
instance of Flux has its own scheduler and configuration, this can aid in
job throughput or scheduler specialization when complex systems of jobs
are being handled.
However, even for a small hierarchy of jobs, understanding the state of running instances can be a challenge, so Flux offers several high level concepts and tools to ease their management.
This guide gives an introduction to managing Flux job hierarchies, whether they are initiated under a Flux system instance, a foreign resource manager, or under a test session running on a laptop.
Instance level (depth)
A Flux instance records its depth in the current job hierarchy in the
instance-level attribute. This attribute can be useful when descending
a hierarchy of jobs. In this guide, the following value of PS1 will
be used to indicate the size and depth of the current enclosing instance
for reference purposes:
$ export PS1=$'${FLUX_URI+[s=$(flux getattr size),d=$(flux getattr instance-level)]} $ '
$ flux start --test-size=1
[s=1,d=0] $
Note that the depth starts at 0 for any instance that is not started as a Flux job, such as the system instance, an instance started under a foreign resource manager, or a test instance as above. An instance with a depth of 0 is also called the root instance.
Create a simple test hierarchy
A hierarchy of Flux jobs starts with a system instance of Flux or a single
user instance started under a foreign resource manager or via the
-s, --test-size=N option of flux-start(1). In this guide, we will
start a test instance of size 4, since this can be performed in any
environment where Flux is installed:
$ flux start -s 4
[s=4,d=0] $
However, the example commands used here should work similarly no matter how your instance of Flux was started, though the amount of resources available in your Flux session may differ and jobids will not match those in examples.
Now we can initiate some test batch jobs. In Flux, batch jobs are submitted with the flux-batch(1) command, which starts a new Flux instance and runs the provided batch script as the initial program of the instance. When the batch script exits, the Flux instance shuts down and exits as well.
[s=4,d=0] $ flux batch -n2 --wrap flux submit --wait --cc=1-1000 sleep 10
ƒ9anfxdew
[s=4,d=0] $
The command above uses the flux batch --wrap option to wrap
the remainder of arguments in a #!/bin/sh script, which allows us to
submit a one-liner batch script without creating a separate file. The batch
script then submits 1000 copies of sleep and waits for them all to
complete. The --wait is important here, since flux submit
exits by default after all work has been submitted, and this would cause
the batch script to exit and terminate the batch job before any work is
complete.
Now, verify that the job started running:
[s=4,d=0] $ flux jobs
       JOBID USER     NAME       ST NTASKS NNODES  RUNTIME NODELIST
   ƒ9anfxdew grondo   flux        R      2      1   2.415m fluke108
[s=4,d=0] $
If your terminal supports color, this job will be highlighted in blue to indicate that it is an instance of Flux.
In order to demonstrate a deeper job hierarchy, we also submit a job that itself submits more batch work:
#!/bin/sh
flux batch -n2 --wrap flux submit --wait --cc=1-1000 sleep 10
flux submit --cc=1-1000 sleep 10
flux queue idle
Here, the batch script batch.sh submits another batch job requesting 2
cores from the enclosing instance, again running 1000 sleep jobs. Then
another 1000 sleep jobs are submitted directly, to show that batch
and normal jobs can be mixed together. Finally, since each of these jobs
were submitted without the --wait flag, flux queue idle is used
to block until the job queue is empty, meaning all work has completed.
[s=4,d=0] $ flux batch -n6 batch.sh
ƒByFye1Xm
[s=4,d=0] $ flux jobs
       JOBID USER     NAME       ST NTASKS NNODES  RUNTIME NODELIST
   ƒByFye1Xm grondo   batch.sh    R      6      2   6.653s fluke[108,108]
   ƒ9anfxdew grondo   flux        R      2      1   5.348m fluke108
Listing Flux instances
When listing jobs with flux-jobs(1), there are several fields
specific to Flux instances which may be useful. These are prefixed with
instance. and are detailed in the OUTPUT FORMAT
section of the flux-jobs(1) man page.
For example, these fields can be used to show the progress and utilization of running batch jobs for the current user
[s=4,d=0] $ flux jobs -o '{id.f58:<12} {name:<12} {instance.progress!P:>5} {instance.utilization!P:>5} {instance.gpu_utilization!P:>5h} {nodelist}'
JOBID        NAME          PROG CORE%  GPU% NODELIST
ƒByFye1Xm    batch.sh     7.99%  100%     - fluke[108,108]
ƒ9anfxdew    flux          8.2%  100%     - fluke108
[s=4,d=0] $
Here progress is the percent of total jobs that are inactive, and utilization is the total number of a resource in the instance that is currently allocated. No GPU utilization is displayed since there are no GPU resources allocated to this instance.
Listing jobs recursively
By default, flux-jobs(1) only lists jobs in the current
enclosing instance. However, with the option -R, --recursive,
any job that is also an instance of Flux will be listed recursively:
[s=4,d=0] $ flux jobs -Rf running
       JOBID USER     NAME       ST NTASKS NNODES  RUNTIME NODELIST
   ƒByFye1Xm grondo   batch.sh    R      6      2   3.876m fluke[108,108]
   ƒ9anfxdew grondo   flux        R      2      1   9.113m fluke108

ƒByFye1Xm:
     ƒwbiYwb grondo   sleep       R      1      1   0.143s fluke108
     ƒwbiYwa grondo   sleep       R      1      1   0.175s fluke108
     ƒwbiYwZ grondo   sleep       R      1      1   0.850s fluke108
     ƒwaEZfE grondo   sleep       R      1      1   1.152s fluke108
     ƒdT7Lrj grondo   flux        R      2      1   3.845m fluke108

ƒByFye1Xm/ƒdT7Lrj:
     ƒnSxz4B grondo   sleep       R      1      1   1.637s fluke108
     ƒnSxz4A grondo   sleep       R      1      1   1.664s fluke108

ƒ9anfxdew:
     ƒcgdiQQ grondo   sleep       R      1      1   8.424s fluke108
     ƒcgdiQP grondo   sleep       R      1      1   8.444s fluke108
The depth to recurse can be specified via the -L, --level=N
option. If the --stats option is specified, then each instance output
is accompanied by some job statistics:
[s=4,d=0] $ flux jobs -Rf running -L1 --stats
2 running, 0 completed, 0 failed, 0 pending
       JOBID USER     NAME       ST NTASKS NNODES  RUNTIME NODELIST
   ƒByFye1Xm grondo   batch.sh    R      6      2   6.376m fluke[108,108]
   ƒ9anfxdew grondo   flux        R      2      1   11.61m fluke108

ƒByFye1Xm:
5 running, 296 completed, 0 failed, 700 pending
    ƒ21fSakP grondo   sleep       R      1      1   3.385s fluke108
    ƒ21dxbU8 grondo   sleep       R      1      1   3.435s fluke108
    ƒ21dxbU7 grondo   sleep       R      1      1   4.215s fluke108
    ƒ21dxbU6 grondo   sleep       R      1      1   4.271s fluke108
     ƒdT7Lrj grondo   flux        R      2      1   6.345m fluke108

ƒ9anfxdew:
2 running, 136 completed, 0 failed, 862 pending
     ƒcxwaWC grondo   sleep       R      1      1   6.722s fluke108
     ƒcxwaWB grondo   sleep       R      1      1   6.749s fluke108
Flux pstree command
The flux-pstree(1) command is also useful when working with complex hierarchies of Flux jobs. It offers a pstree(1) like display of jobs by name. Many options are provided to give a high level information about the status of a set of nested jobs.
By default, only running jobs are displayed. Identical jobs are collapsed for a more compact representation:
[s=4,d=0] $ flux pstree
.
├── batch.sh
│   ├── 4*[sleep]
│   └── flux
│       └── 2*[sleep]
└── flux
    └── 2*[sleep]
In the output above the enclosing instance is the root of the tree display
and is represented by a single .. If the enclosing instance is itself
a Flux job, then the job name is used instead of the . placeholder.
Sometimes it is useful to get instance or parent jobids in the display.
This can be enabled with the -p, --parent-ids option, e.g.
[s=4,d=0] $ flux pstree -p
. .
├── ƒByFye1Xm batch.sh
│   ├── 4*[sleep]
│   └── ƒdT7Lrj flux
│       └── 2*[sleep]
└── ƒ9anfxdew flux
    └── 2*[sleep]
All jobs for the current user in any state can also be displayed with
the -a, --all option. In this case, the job status abbreviation is
included to differentiate jobs in different states:
[s=4,d=0] $ flux pstree -a
.
├── batch.sh
│   ├── 220*[sleep:PD]
│   ├── 4*[sleep:R]
│   ├── flux
│   │   ├── 612*[sleep:PD]
│   │   ├── 2*[sleep:R]
│   │   └── 386*[sleep:CD]
│   └── 775*[sleep:CD]
└── flux
    ├── 740*[sleep:PD]
    ├── 2*[sleep:R]
    └── 258*[sleep:CD]
The flux pstree command can also display extended job details before the
tree part with the -x, --extended or the -d, --details=NAME option.
[s=4,d=0] $ flux pstree -x
       JOBID USER     ST NTASKS NNODES  RUNTIME
   ƒByFye1Xm grondo    R      6      2    17.4m batch.sh
    ƒ2FHdyxB grondo    R      1      1   0.411s ├── sleep
    ƒ2FG9zfz grondo    R      1      1   0.462s ├── sleep
    ƒ2FG9zfy grondo    R      1      1   0.663s ├── sleep
    ƒ2FG9zfx grondo    R      1      1   0.692s ├── sleep
     ƒdT7Lrj grondo    R      2      1   17.37m └── flux
     ƒs8GidH grondo    R      1      1   0.625s     ├── sleep
     ƒs8GidG grondo    R      1      1   0.651s     └── sleep
   ƒ9anfxdew grondo    R      2      1   22.64m flux
     ƒez4bmS grondo    R      1      1   2.747s ├── sleep
     ƒez4bmR grondo    R      1      1   2.753s └── sleep
[s=4,d=0] $ flux pstree --details=stats
       JOBID           STATS              RUNTIME
   ƒByFye1Xm   PD:164 R:5 CD:832 F:0      0:17:42 batch.sh
    ƒ2FK7yEZ                              0:00:03 ├── sleep
    ƒ2FK7yEY                              0:00:03 ├── sleep
    ƒ2FK7yEX                              0:00:03 ├── sleep
    ƒ2FHdyxL                              0:00:03 ├── sleep
     ƒdT7Lrj   PD:584 R:2 CD:414 F:0      0:17:40 └── flux
     ƒs9khue                              0:00:03     ├── sleep
     ƒs9khud                              0:00:03     └── sleep
   ƒ9anfxdew   PD:728 R:2 CD:270 F:0      0:22:56 flux
     ƒfGNTsD                              0:00:01 ├── sleep
     ƒfDQVJY                              0:00:01 └── sleep
[s=4,d=0] $
When the -x, --extended or -d, --details=NAME options are used,
then the root of the tree is automatically skipped. To restore the
display of the root instance, the --skip-root=no option may be
used.
Flux top command
The flux-top(1) utility may also be used to explore nested jobs.
If run without arguments, it monitors the default Flux instance, but it
can also target a running job using a high-level URI such as a Flux jobid.
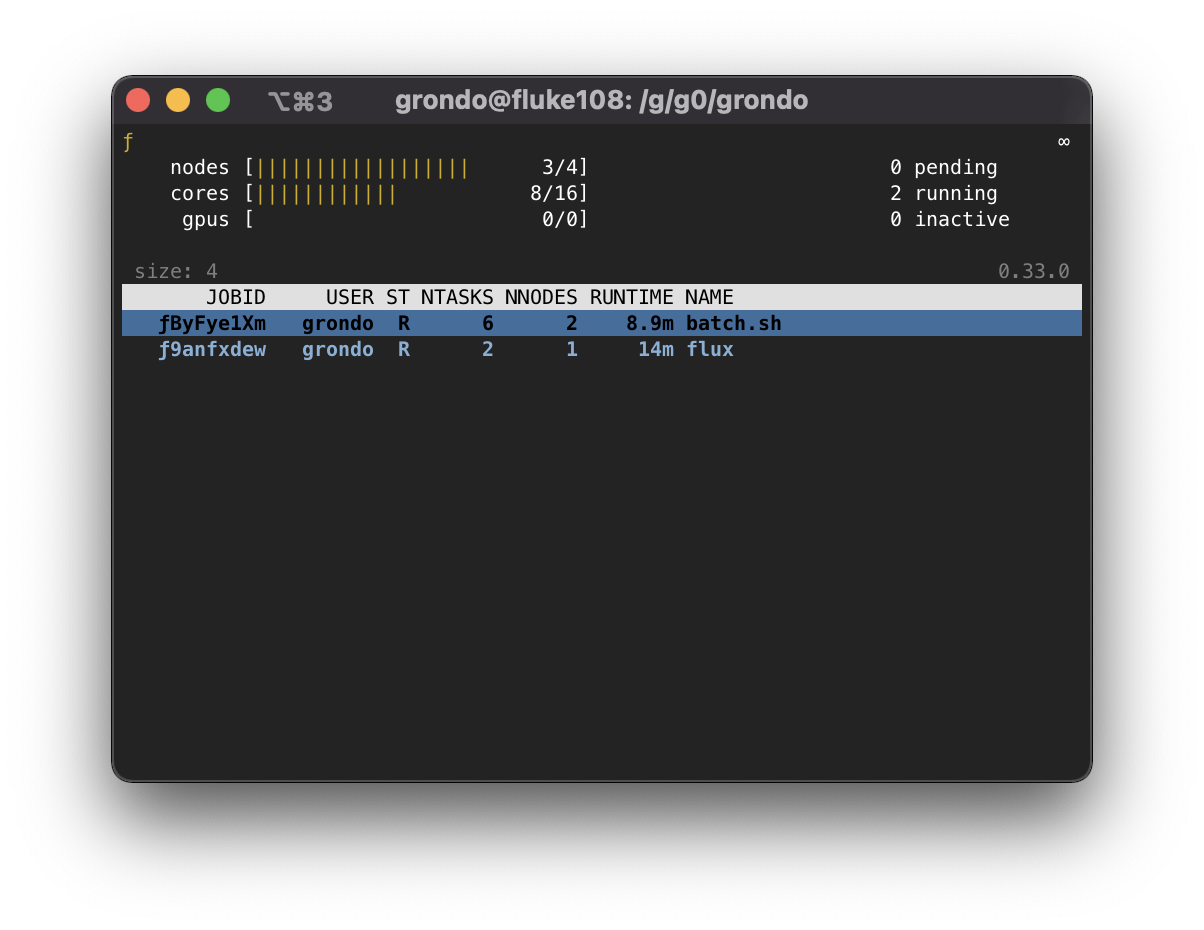
Once flux top is started, it displays a summary of information in the
top pane, including the jobid (if running against a job), a summary of
resource status, the instance depth, the time remaining if the job
is running with a time limit, and high-level job statistics including
the total number of pending, running, and inactive jobs.
Below the summary pane, a live view of jobs is displayed. Jobs which are
also Flux instances are colored in blue. Active Flux instances can be
selected by paging through the job display with the up and down arrow
keys or j and k.
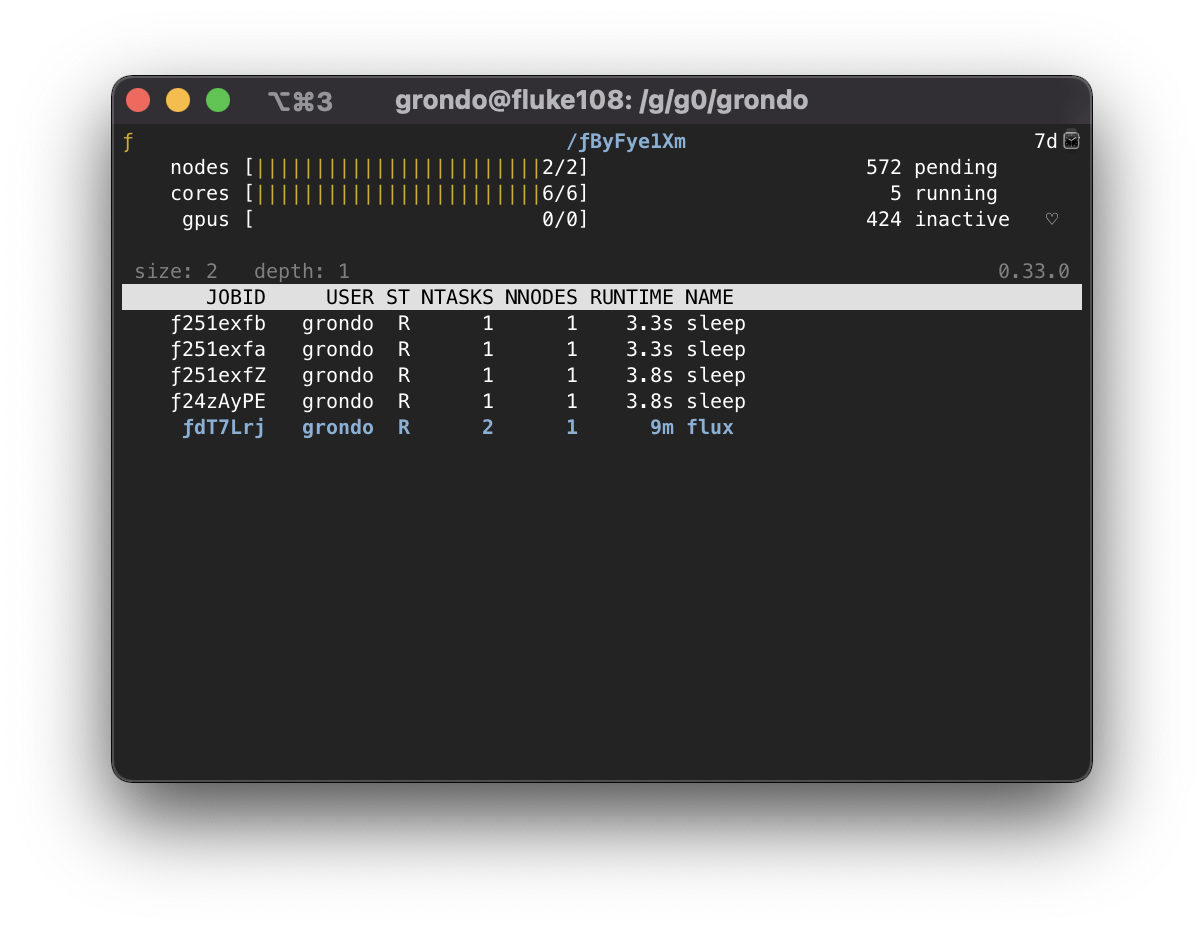
Once a job of interest is selected, flux top will recursively call
itself on that job when the enter key is pressed. The summary and job listing
will now reflect the selected job:
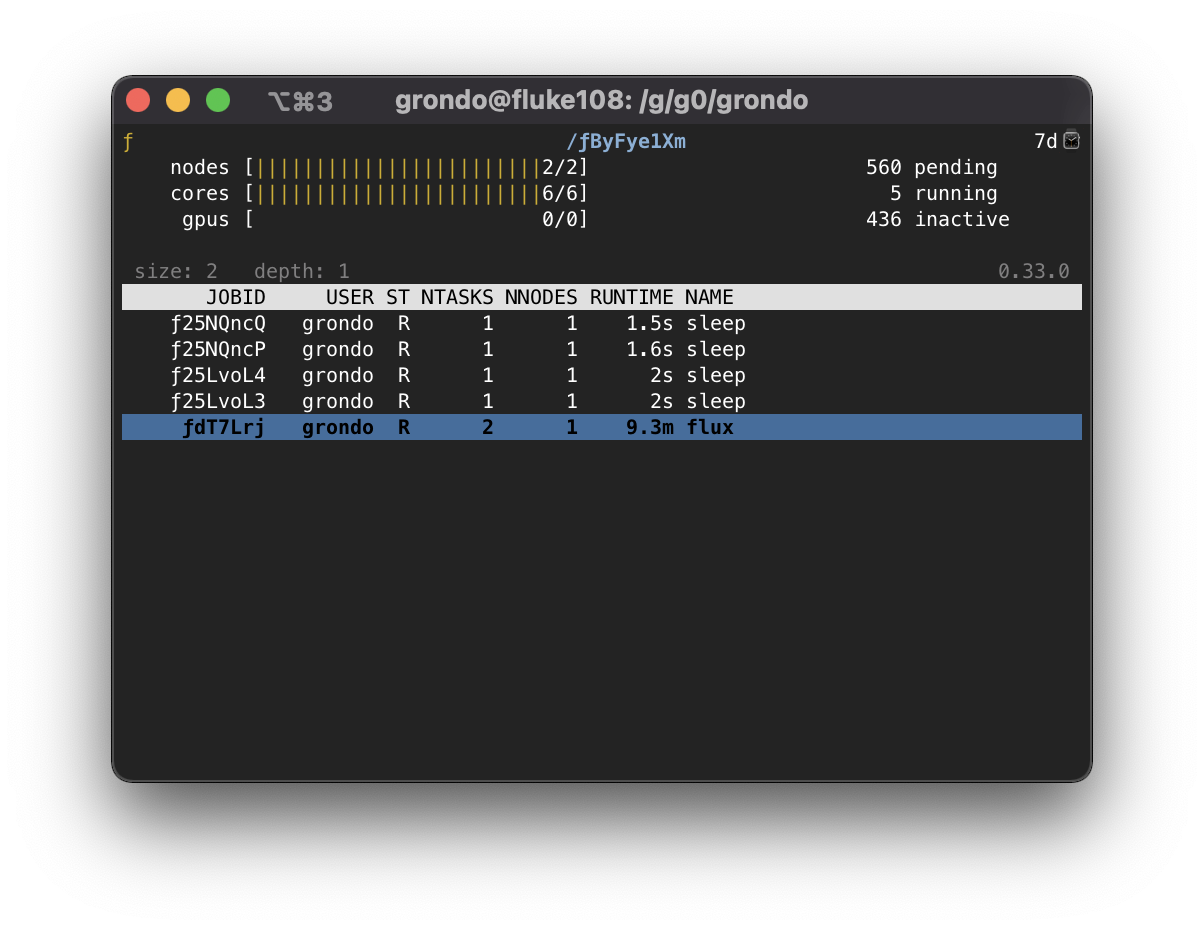
If there are further jobs interest, the procedure may be repeated:
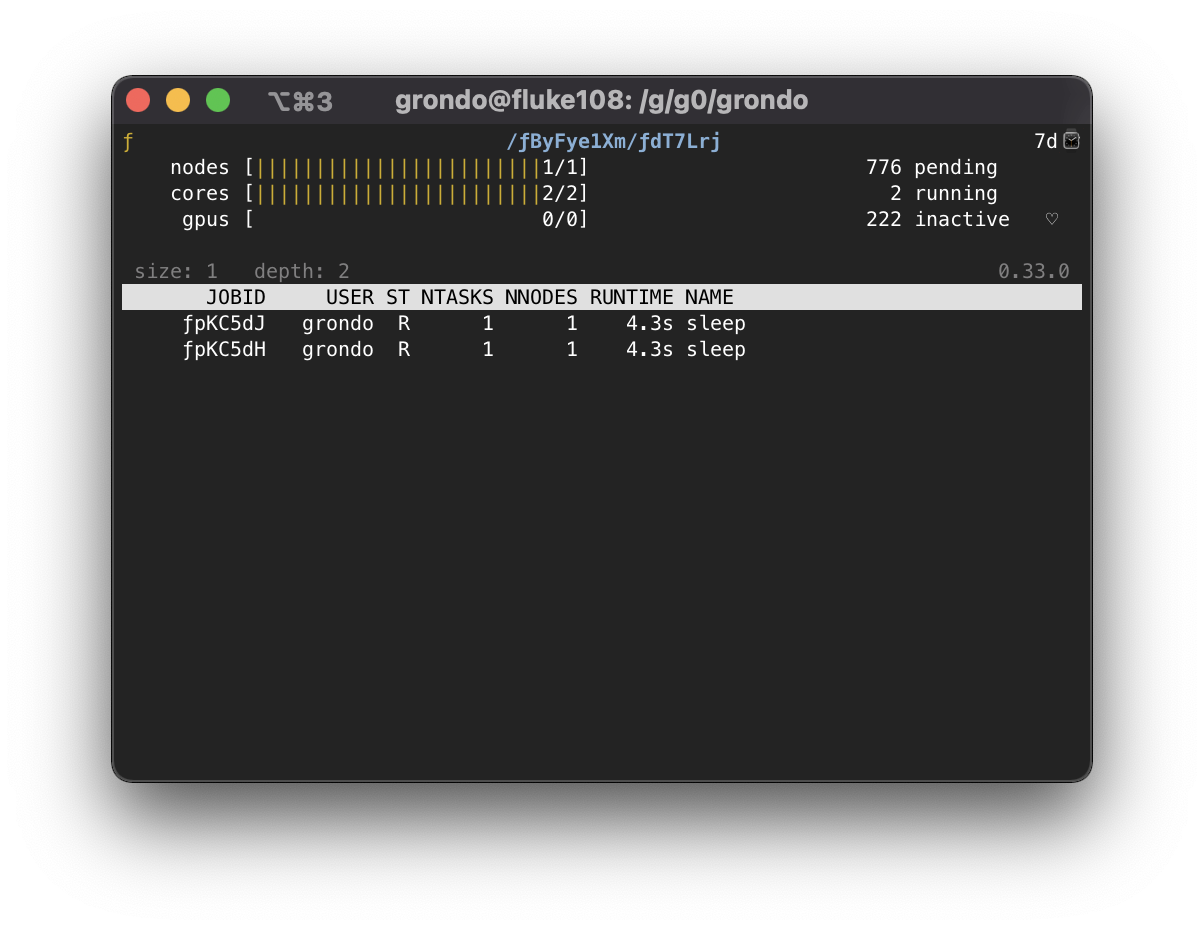
To pop back up to the previous instance, use the q key. At an instance
depth of 0, flux top will exit.
The flux top command can also directly target jobs by jobid or high-level
URI. This means that a nested job can be targeted directly by a path of jobids,
e.g.
[s=4,d=0] $ flux top ƒByFye1Xm/ƒdT7Lrj
Connecting to nested jobs
The flux-proxy(1) command can be used to connect to a target Flux
instance anywhere within job hierarchy. This allows a user to interact
with the job as an enclosing instance. The flux proxy command can take
any high-level URI as its argument (See flux-uri(1) for a detailed
description of Flux URIs), so a jobid works fine:
[s=4,d=0] $ flux jobs
       JOBID USER     NAME       ST NTASKS NNODES  RUNTIME NODELIST
   ƒByFye1Xm grondo   batch.sh    R      6      2   22.12m fluke[108,108]
   ƒ9anfxdew grondo   flux        R      2      1   27.35m fluke108
[s=4,d=0] $ flux proxy ƒByFye1Xm
[s=2,d=1] $
Note that our prompt now reports that we are at an instance depth of 1
instead of zero. We can now interact with this child instance as if it were
our enclosing instance.
flux proxy spawns a new shell after connecting to the target instance.
To disconnect, simply exit the shell:
[s=2,d=1] $ exit
exit
[s=4,d=0] $
Since flux-proxy(1) supports any high-level URI, it is also possible to connect to a nested job directly, e.g.:
[s=4,d=0] $ flux proxy ƒByFye1Xm/ƒdT7Lrj
[s=1,d=2] $ flux resource list
     STATE NNODES   NCORES    NGPUS NODELIST
      free      0        0        0
 allocated      1        2        0 fluke108
      down      0        0        0
[s=1,d=2] $ flux jobs --stats-only
2 running, 724 completed, 0 failed, 274 pending
[s=1,d=2] $
Or even a Flux instance running as a Slurm job:
$ squeue -u grondo
    JOBID PARTITION     NAME     USER ST       TIME  NODES NODELIST(REASON)
  8327174    pdebug     flux   grondo  R       0:22      2 quartz[4-5]
$ flux proxy slurm:8327174
[s=2,d=0] $ flux resource list
      STATE NNODES   NCORES    NGPUS NODELIST
      free      2       72        0 quartz[4-5]
 allocated      0        0        0
      down      0        0        0
[s=2,d=0] $